Kay
folks here's a little step by step I've put together. It can be a little
tedious but once you get the steps down you can really zip through it,
and you'll be pleased with the results.
Fig 1. Here I've chosen the letter "J" cuz it has both
straight and curved elements to it. I have put three outlines on it. The
first outline is quite small off the letter, the second one is gonna be
combined with the first to create your bevel. The distance of the second
can vary depending on how thick you want your bevel. The third I added
for an outline to be filled later.
And don't forget when you put the outline (contour in Corel) to break it
apart or separate it from your original object.
Fig 2. Now select your first and second outline (red) and
"combine" the two. I like to duplicate a copy next to it and
work on it there. Next draw small boxes and angle it on your corners.
They must be closed shapes to do the next operation.
Once I have drawn one box I can duplicate the rest and modify the angle
for the next corner or transition point. Now select all of your boxes
and combine them. With your boxes selected go to your shaping menu and
select "Trim" make sure the source object box is checked. Now
simply click on yer combined outlines.
Fig 3. Now your Outlines will be trimmed and you will have separated
objects. Your little boxes will remain so you will have to delete them.
Fig 4. Here I had to go in with my shape tool and curve the transition
points on the curved sections and do a little editing on the corners to
fill the gap abit. I do like to leave a little gap to define the edge.
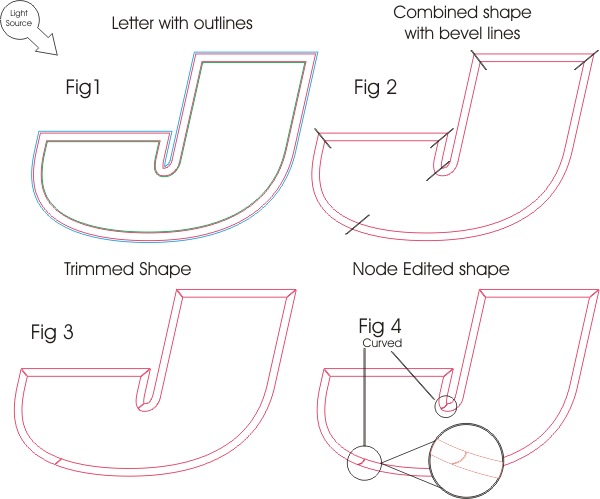
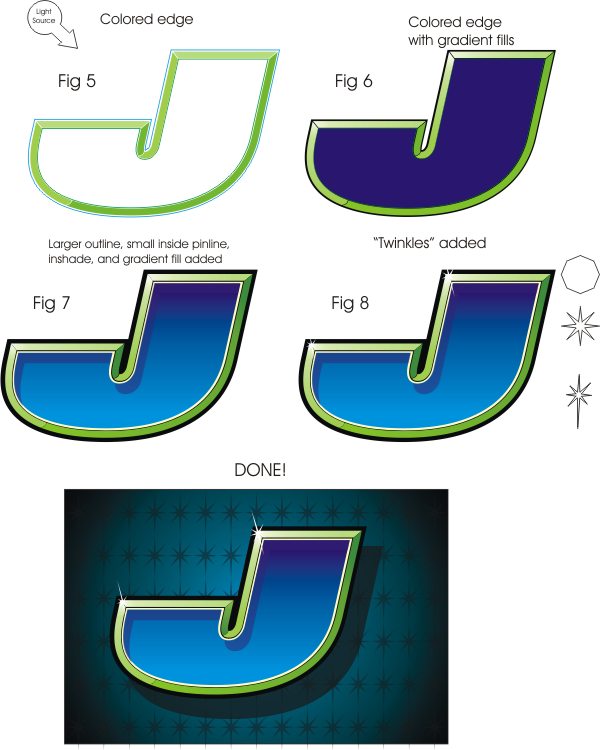
Fig 5. Now you can place your beveled edge on your letter and start
adding color. You will have to "break apart" the shape first
so you can separate the shapes to add different colors to them. I chose
my Fav color "Slime Green" for the beveled edge. The lightest
shade of your color will be on the top and left side of your letter, the
darkest on the right side. I used my base color Slime Green and mixed
the lighter and darker shades myself. Now its getting to look cool.
Fig 6. Just for some added effects I like to add gradient fills on the
bevels. Yer lightest spot should be your northwest corners. I added a
bit more darkness to the very upper right corner to add a bit more
contrast. Don't go too light with the fills or you will lose or gain too
much contrast so you may have to play around with the fill for a bit to
get it right. Since my bevel color is on the light side, I colored my
letter a dark purple.
Fig 7. Here I've added an off white pin line to separate the dark letter
and edge abit. A gradient fill on the letter and an in shade for some
dimension. I also beefed up the outside outline.
Fig 8. This where we can add some "Twinkles". Select your
polygon tool, Hold CTRL and draw an 8 point polygon. Get your shape tool
while holding CTRL grab one the nodes and drag it inward to your desired
radius. Now you have to convert your object to curves, once you have
done that you extend the "arms" on it. Fill it with white and
place it on your brightest spots. Its a neat little effect.
Your pretty much done! I added a dark background with a hot spot in it
and a drop shadow with a transparency on it to give it that natural
look.
Remember to have fun with it and do some experimenting because
"CTRL Z" is your friend.
Keep on Jammin!!
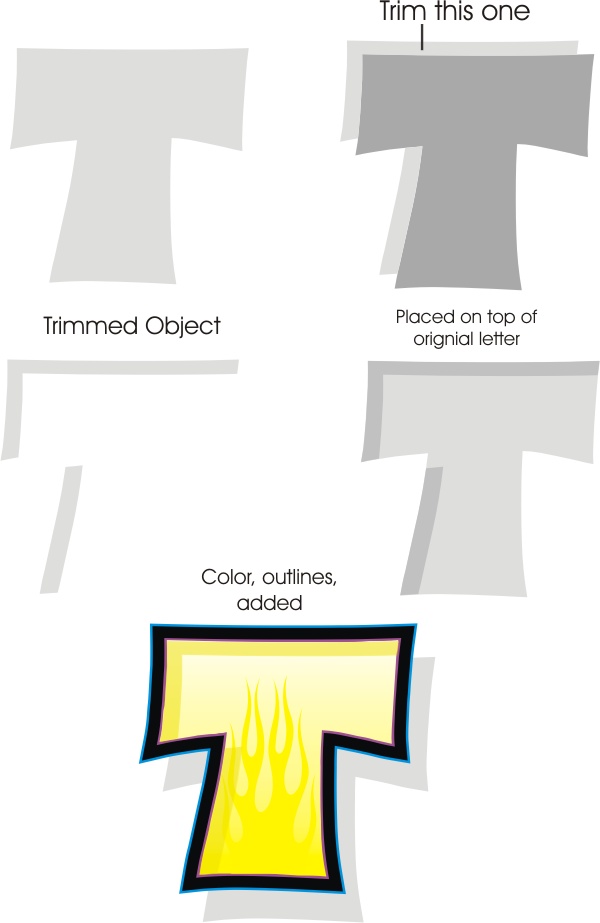
How
to achieve the in shade. This is actually quite easy to do.
First thing you do is duplicate your letter off to the side. I prefer to
move it on axis so placement back on top of original letter is easy.
Duplicate another letter in front of it and move it down and to the
right.
Select the front letter. Now go to your shaping menu and select the
"trim" function with the source object box checked. Now just
click on the letter in the back and there ya have it.
Place you trimmed object on top of the original and now you can add
color and effects to it.
Pretty easy and it looks cool!
Have fun!
|