Cutout
MDO Graphic...Step By Step |
This article uses thumbnail images. Click on a highlighted image to see a larger copy.
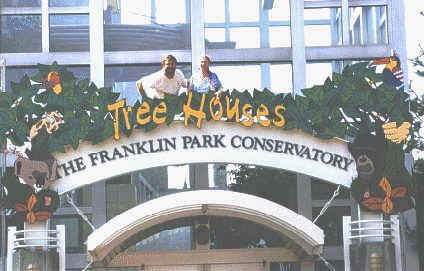
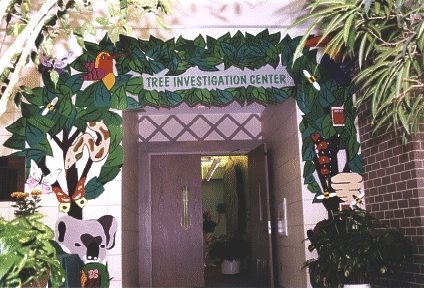
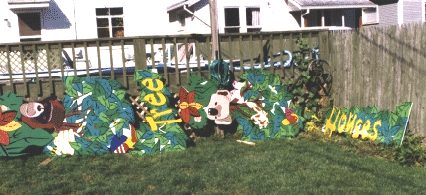
This project involved many different sign types but I’ll concentrate on the hand lettered MDO (medium density overlay) graphic that attaches to the steel I-beam entrance structure and how we used the computer to help. |
 We originally tried scanning and tracing the print which produced about 11.5 gazillion objects. We contacted the designers and were able to get a Mac disk of the logo which we took to a computer rental place and converted to an Adobe Illustrator 3.0, DOS format to import into CorelDRAW. This process could almost make an article in itself. This produced a much smaller drawing consisting of a mere
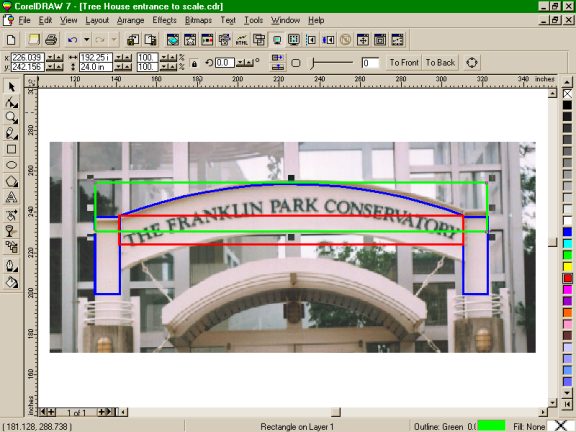
2.4 gazillion objects. (Good thing we’re not goi A box or line created at a precise scale measurement
placed on top of the photo where the measurement was taken can be used to bring the photo
into scale. We imported the logo image file, broke it apart and rearranged the objects, along with some replicated leaves and lettering, on top of the photo to show the customer what the sign would look like once completed. Once the print was approved the real fun begins. |
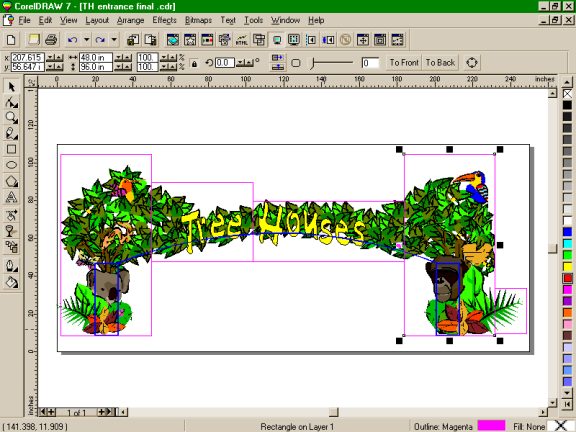 We start the final layouts by selecting the graphic and
sending it to the back and using the photo as a ‘go-by’, lay down lines on the
structure that would later be used to attach easels and braces to the back side of the
sign to hold it in place. At this point the photo is no longer needed so it’s
deleted. Since MDO comes in 4’x 8’ sheets and this sign will be about 24 feet we
need to figure out the best use of the wood, so rectangles representing the wood sheets
are laid out on top. [screen2.jpg] We start the final layouts by selecting the graphic and
sending it to the back and using the photo as a ‘go-by’, lay down lines on the
structure that would later be used to attach easels and braces to the back side of the
sign to hold it in place. At this point the photo is no longer needed so it’s
deleted. Since MDO comes in 4’x 8’ sheets and this sign will be about 24 feet we
need to figure out the best use of the wood, so rectangles representing the wood sheets
are laid out on top. [screen2.jpg] |
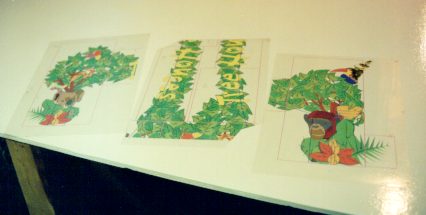 We were going to plot
patterns and perforate them but then thought an overhead projector would be much quicker.
We found you can rent them for about $50 a week, however, I found a used one for $75 and
bought it. Using transparency sheets, tiled prints are made. [trans.jpg] At 1/10th scale,
a 1000% blowup is a snap. Note: With most opaque projectors only about a 400% blowup is
possible. We were going to plot
patterns and perforate them but then thought an overhead projector would be much quicker.
We found you can rent them for about $50 a week, however, I found a used one for $75 and
bought it. Using transparency sheets, tiled prints are made. [trans.jpg] At 1/10th scale,
a 1000% blowup is a snap. Note: With most opaque projectors only about a 400% blowup is
possible. |
 After cutting the wood into basic
rectangles (sizes from our scale prints) it’s primed. Use interior or exterior where
applicable. Once dry the images are projected on them using the magenta panel lines as an
outside guide and drawn in with a pencil. The projections will be distorted so the parts
will have to be butted next to each other to be sure they line up correctly prior to
cutting and painting. After cutting the wood into basic
rectangles (sizes from our scale prints) it’s primed. Use interior or exterior where
applicable. Once dry the images are projected on them using the magenta panel lines as an
outside guide and drawn in with a pencil. The projections will be distorted so the parts
will have to be butted next to each other to be sure they line up correctly prior to
cutting and painting. |
 The wood we don’t want is cut away
with a jigsaw. The edge of the cut wood will now need primed also. Since this is for
outside use, you’ll first need to fill in the holes or voids with exterior spackling
or wood filler and allow to dry. Sand the parts, remove the dust and we’re ready to
letter. Note: This article is based on a temporary sign, if you are making a
permanent exterior sign you will need to have at least 2 coats of finish paint. Now
it’s paint by numbers time. Jan did most of the fill colors and I came back with
quills to do the outlines and highlights. To dry we placed them in the Ultra UV heater
area (backyard in the sun). Here’s the parts drying in our curing racks. :)] The wood we don’t want is cut away
with a jigsaw. The edge of the cut wood will now need primed also. Since this is for
outside use, you’ll first need to fill in the holes or voids with exterior spackling
or wood filler and allow to dry. Sand the parts, remove the dust and we’re ready to
letter. Note: This article is based on a temporary sign, if you are making a
permanent exterior sign you will need to have at least 2 coats of finish paint. Now
it’s paint by numbers time. Jan did most of the fill colors and I came back with
quills to do the outlines and highlights. To dry we placed them in the Ultra UV heater
area (backyard in the sun). Here’s the parts drying in our curing racks. :)] |
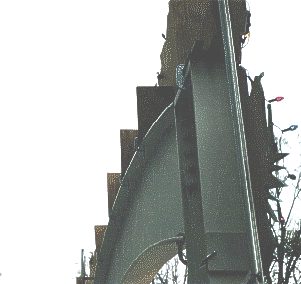 Now for the install. The parts are
taken back to the projection room (our garage) and are placed with the back side now
showing. The transparency is placed upside down on the projector and lined up. A line is
drawn on the back representing the top of the steel arch (the blue line in above picture).
We attach simple 3/4” plywood ‘easels’ to the back by shooting screws
through the face into them. [back1.jpg]. The parts are then placed on top of the beam and
held with C-clamps. A little minor adjustments are in order with some wood shims. A little
piece of scrap MDO is used to tie the parts together. The outside pieces were attached
last by clamping a board to the vertical I-beam then shooting the screws through the front
to grab it. A few screwhead touch-ups with Q-tips and it’s complete. Now for the install. The parts are
taken back to the projection room (our garage) and are placed with the back side now
showing. The transparency is placed upside down on the projector and lined up. A line is
drawn on the back representing the top of the steel arch (the blue line in above picture).
We attach simple 3/4” plywood ‘easels’ to the back by shooting screws
through the face into them. [back1.jpg]. The parts are then placed on top of the beam and
held with C-clamps. A little minor adjustments are in order with some wood shims. A little
piece of scrap MDO is used to tie the parts together. The outside pieces were attached
last by clamping a board to the vertical I-beam then shooting the screws through the front
to grab it. A few screwhead touch-ups with Q-tips and it’s complete. |
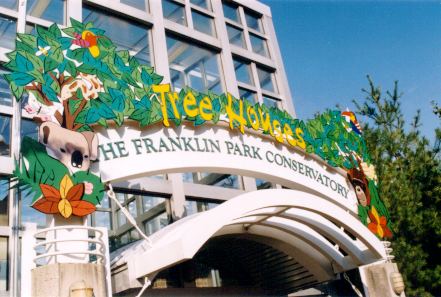 Hope you enjoyed this as much as we did. Cutouts and dimension give signs a real flare that people notice. As you can see, it’s really easy and you can get a lot more money out of this type of work for just a small investment in time and a couple tools. Hope to see you all at the B.I.G. show in our home town, Columbus, Ohio this summer. Have a Grateful Day! Pat
Moorehead - MOD |
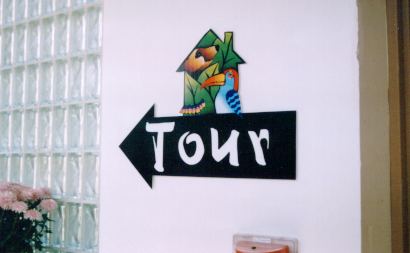
Here’s some other signs we did for the show:
|
| Pat and his wife, Jan Orick, operate MOD,
Moorehead Orick Design in Columbus, Ohio USA. In his spare time, he is a moderator in the
Signmaking discussion area of Chris Dickman’s i/us
website and serves on the Board of Directors for the Columbus
Computer Society. (This is because he is really bored since the Grateful Dead no
longer tour.) Take a few minutes and visit the Moorehead Orick Design website or drop them some e-mail. Thanks for sharing this with us Pat! [ Home | Join Us! | Bulletin Board | Events | Find A Letterhead | Become A Resident | Letterville Merchants ] Copyright © 1998 The Letterhead Website |