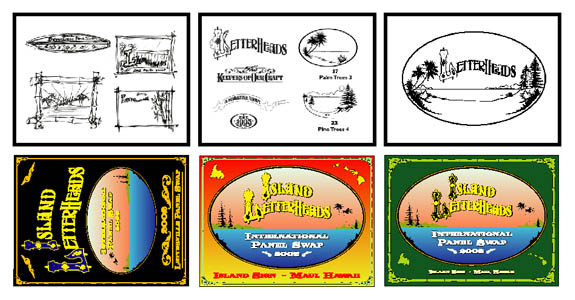
created in Adobe Illustrator. I had considered using the Letterville logo, but when I saw the
"Letterheads" lettering in the A.M.A.L. masthead, I really liked that. I emailed David Butler
who did the AMAL masthead logo & received permission to use his lettering. My early sketches
resulted in the lower left one spawning the idea of the two islands with lettering in the center &
a bamboo border. Along with some fragments of the AMAL logo that David sent me, the second image
shows some Steve Kafka shoreline clip art. The third image has the basic layout coming together
in the proportions of an 18" x 24" panel. Then I started playing around with colors, lettering,
& some variations on the basic layout. I was real tempted to go for the bright background,
but the green was selected.
This next group of images shows the sequence of steps in getting the paint & vinyl onto the panel.
I bought a spray gun from a painter who was doing some work on my house & he gave me a lesson
in spraying a nice finish on a panel. I had done a test panel that came out okay, but having no
ventilation in my shop, I decided after cleaning paint out of my nostrils for a few days to just
roll on some One Shot Dark Green. Then I laid down an oval in Black vinyl. After applying a vinyl
mask I rolled out the fade. I happened to use Naz-Dar enamel inks which are very thick & once I
got a nice blend on some card stock I was able to roll out a thick coat of ink on the panel.
Removing the mask while the ink was wet can be a chore. The detail around the trees was challenging
& I probably could have just painted an oval & then added the trees in black vinyl. After I got all
my lettering & borders printed & cut on the Edge, I masked the lettering for the gold size.
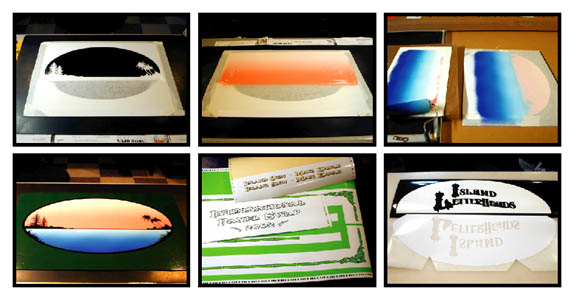
The final few pics shows the mask applied to the black lettering on the panel. The size has some
yellow one shot mixed in. When I set up the file for the mask, I added an outline around the shape
of the letters to be gilded. The center pic shows where this extra bit of mask was removed after
sizing. This allowed me to remove mask from the edge of the size while it was still wet to avoid
risk of pulling up any size, while still leaving most of the panel protected from excess gold needing
to be cleaned. After adding a little decoration in the letters I & L, the panel was done.

Doug Allan of Island Sign's in Kahului, HI