|
A
Letterville Step By Step By Don Coplan
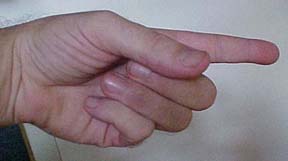
For our first step-by-step, I'm going to share with you the basics of creating clean, cuttable vector "clip art" from a photograph. Usually, the first thing to be done is to scan the photo or artwork that we want to vectorize. I prefer to keep the scan as small as possible, while still allowing a large enough scan to trace over with Adobe Illustrator. (This step by step applies primarily to Adobe Illustrator/Photoshop and Corel/Photopaint, although there hopefully are some tips in this article that others will be able to use.) An image of 6" to 10" will work great. I set my resolution at 100 to 150 ppi, depending on how detailed the artwork is. Higher resolutions are sometimes necessary when dealing with alot of detail, but can slow down your graphics program. Once we've scanned our photo, usually it's ready to import into our drawing program. The exception is when it's obvious that it will be difficult to discern the lines in the image well enough to draw over them. If you need to adjust the contrast, open the scan in Adobe Photoshop (or whatever program you use for photo editing). In Photoshop, you can adjust the lightness and darkness by Image>Adjust>Levels or Image>Adjust Contrast.
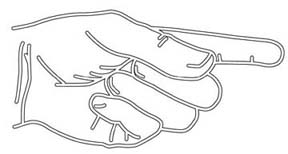
Our next step, after saving the scan, is to import it into your drawing program. With Illustrator, we can choose File>New to create a new page, then choose File>Place and navigate to the scan file to import. Whether to put the imported scan on a separate layer or to merely lock it on the page depends on personal preference. I lock it, since creating more layers uses up more computer memory. The end result is the same either way. Next step is to choose the pen tool from the toolbox. You'll notice in Illustrator that you have several pens to choose from, a pen with a "+" and one with a "-", one with a ">", as well as the default pen. I use the default pen, because the other three types of pens can be toggled from the keyboard. The "pen +" (or add node) tool and "pen -" (or delete node) tools toggle automatically from the default pen tool when your cursor is placed over a selected line. The "pen >" or edit curves tool is activated by holding down the option/alt key while using the default pen. This saves a lot of time by not constantly having to select the various types of pen tools from the toolbox and allows you to concentrate on the drawing instead of looking for the correct pen in the toolbox. A good way to practice drawing with the pen tools is to "write" your own name in cursive script, or just doodle. It won't necessarily be beautiful, but you'll soon get the hang of making the pen's lines do what you want. Basically, to draw well with the pen tool, there are three things you need to learn to do with it. Compare this to learning to play a guitar...three chords and you can play half the songs ever written! :) The first and simplest thing to learn is to make a straight line. It's almost too basic to include in a step-by-step, but this IS Introduction to Vector Drawing 101! Just click on where you want the line to begin, and click again at where you want the straight line to end. When you want the line to be perfectly horizontal, vertical or at 45 degree angles, hold down your shift key before the last click. Nuff said? hahahaha (A little hint: the shift key trick works for over tools, too!) The second type of line is a curve. It's almost as easy as a straight line, but requires a bit more hand eye coordination. For a curve, click, then drag from where you want the curve to begin, while still holding down your mouse button. You don't have to drag far at all, as the dragging creates "handlebars", which can be fine tuned to your intended shape later. The third thing you will need to know how to do with the pen tool is how to adjust a curve. To fine tune a curve, while the line is selected, hold down your Option/Alt key, which toggles the pen to the "edit curves" pen tool, click on the end of either side of the handlebar and drag, until the line follows the shape you need. Notice that by using the edit curves pen tool, you can click on the node and drag, which pulls the handles equally in two directions (great for round shapes), or you can click on the end of a handlebar and move just that one side of the handlebar, entirely changing the direction of the curve on that side of the node. If this all seems difficult or confusing, just play around with some shapes. Like anything else, it requires practice. Continue following the shapes of the placed scan, placing a node wherever the shape changes direction. (It only takes two nodes to form a line or curve.) You can work fairly quickly here, because you can always go back and place more nodes or adjust handlebars later as needed. Once all the lines are the way you want them, you can unlock and delete the placed scan, then adjust the line thickness as you see fit. Keep in mind that thicker lines are easier to weed, so make it easy on yourself, if possible. I also will usually use round ended lines, though there aren't any rules to it....just whatever looks best to you. I think it just makes for a cleaner finished look when a line's end touches another line. Now, select the entire vector image and make into outline paths by Object>Paths>Outline Path. Again making sure the entire image is selected, use the "unite" tool in the Pathfinder palette to weld the artwork. The finished clipart can be as rough or as precise as you have the time (or customer budget) to do. |