|
This step by step is dedicated Manny.
The first step is
design. It is the most
important part. What are the aspects of design?
Composition, balance, letter weight, and styles.
I was looking for a letter style that had an antique
look that would lend itself well to gold leaf.
Ephemera was the type font I chose.
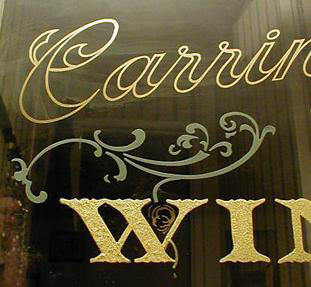
The outline is to be in mirror gold and the centers
or the body of the letters are surface gilded with
12 carat "white" gold leaf. All the mirror gold is
outlined a second time with black, and that time we
will add the drop shadow. The letter height of the
script copy is 3 inches, the "fine" copy is 1 1/4
inches and the "wines" is 1 3/4 inches. In addition
to the gold leaf work the glass is ornately etched,
and glass glue chipped.
The border graphics were acquired from "Walter", who
had a shop in Newport Beach, California, in the
fifties. He said, "If you take care of these, I'll
give them to you." There were stacks of blue prints
of etch work, and sign proposals. The guy who drew
them; "Manny" worked for, and was friends with
"Walter", and now Walter was giving his designs to
good homes, because Manny had recently died. His
sadness was heartfelt, on my part, and I said,
"I would put them to good use."
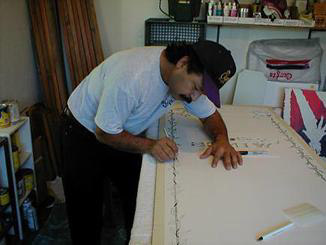
I covered the areas to be blasted with
Continental sandblast mask; "butter cut", as we
call it, spray glued the pattern down, and
started to cut away. This is by far is one of
the most important parts, and special care must
be given to the detail. Yes! I know, you can get
sandblast mask for your plotter, but I wanted this
to be done by hand, and its easier to make
corrections on the fly.
Once the pattern was cut I took the glass to the
backyard for sandblasting. Armed with the nozzle
at hand, looking like one of those guys from the
"Haz`Mat" team, I slightly etched the glass along
with the portions I wanted to Glue Chip. This
process used #60 grit sand, and a low pressure of
#70 PSI. The blasting took about 1/2 hour. I have
a Sears 6HP upright compressor, hooked up to a
20 gallon pressurized home sandblasting unit.
I met Walter Methner in
Pollock Pines, California
during a letterhead meet at Gary Rhodes, of
Rose Art signs and graphics. There Walter brought
out some blue prints, and was giving them away.
He said that his good friend Manny had made them
for his sign company he owned during the fifties.
There was a stack three inches thick, with all
kinds of drawings including, glass etch work,
sign blanks and layouts, artwork from his home;
Spain, decorative iron, and mounting systems,
plus too many more to mention. I was looking at
this guys whole life's work, all from the fifties.
The design below was among the many patterns Manny
gave me.
Step 2: Glass Glue Chipping
The concept behind glue chipping is; as the glue
dries, it contracts, and pulls up chips of glass
as it does so. It is dried animal hide mixed with
water at a ratio of 1 1/2 parts water and 1 part
glue. This formula is for horizontal application.
After mixing, and soaking for awhile, bring the
mixture's temperature up slowly to #145 degrees,
just before it starts to bubble. Do not over cook
it. There are many way to heat it; Electric glue
pot, crock pot, water bath, and microwave.
Since the portions of glass I wanted to chip were
small, I didn't roll out asphaltum, I brushed it.
The asphaltum is used as a chemical barrier. The
glue is water soluble, and the ashpaltum is oil
base. Water and oil don't mix. So, when your
applying the hot glue, it will flow out to, but
not past the asphaltum. It is necessary for the
glue to "bead up" with a generous amount, actually
"doming" it to 1/8" to 3/16" thick.
The glass must be completely level, as the glue
cools, and flows out. It shouldn't take long for
the glue to tac up. The glass then has to be heated
to around 150 degrees for drying. A "make shift"
tent, with a heated inside should work, if you
don't have a drying box. As your glue dries,
you'll hear; "tink" when it starts to chip your
glass.
After spending a couple of hours in a heated booth,
you'll be able to see if it has completely chipped.
If not, stick it back under the heat. You'll be able
to tell right away, if it's not. Once its done, let
cool. Remove the excess with a X-acto, or a chipping
tool. Remove all the asphaltum with mineral spirits,
and remove the excess glue with soapy water. Clean
and pad dry.
The photo below shows the application of chipping
glue.
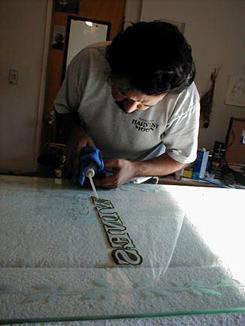
The Asphaltum is used as a chemical barrier.
It is a refined tar that is in liquid form.
It dries hard, and can hold the mask while
you are blasting.
Under normal circumstances the entire piece
of glass is coated with asphaltum. Since I
had a small area to do, and I didn't want to
go through all the trouble just for a couple
of small areas, so I stroked it.
As the glue starts to flow out, it reaches the
asphaltum, but will go no further, and starts to
bead up, like a drop of water on a counter top.
This is important because the glue needs to be
put on real thick. When you think you've put
enough glue, put some more. Real thick.
The asphaltum can be rolled on just like paint.
The glass is
1/4" safety glass because it for the
front door to his business.
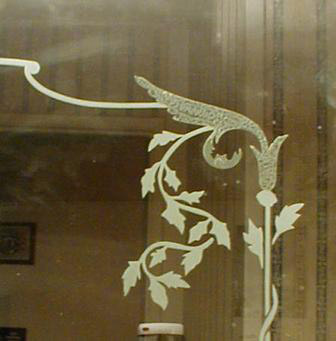
The photo show the difference between glass etch
and glass glue chip. The pattern in the glue
chipped portion show an "iceburg" effect. On the
lettering portion of the word "WINES" I later
came back and mirror gilded it (step 3) with
23kt. glass gold; Giusto Manetti, each "book"
contains 25 leaves 3 3/8"X 3 3/8" inches. The
"gold nugget" effect adds to the antique look.
Gold Nugget effect- is
glue chipped glass that
has been mirror gilded.(water gild)
Tempered glass- it is for that reason that I
started using safety glass or "lami" I too had
the same experience with it breaking into a
million pieces. Most glass I use is 1/4" plate.
Step#3 Mirror Gilding Gold Leaf
Mirror gilding, or sometimes called "Water" gild is
far too much, to explain in just one post. This is
where I would like to see the veterans come forward
and help explain. Maybe I should start with the
materials needed to water gild.
Materials
23kt. Gold Leaf- called, surface, loose, or glass
Gelatin water size- comes in sheets or casuals
Gilders tip- for statically lifting gold leaf
Water size brush- usually constructed entirely
of brass (except handle)
Back-up black- used to seal the gold (brushed or
screen printed) shading, and outlining
Window Spar Varnish- Final seal (brushed)
Cotton balls- used to remove excess gold
"Splash" -used to remove excess gold
Concept
Gelatin water size is "Flowed" on the glass, and while
wet, the gold leaf is applied, using a gilder's tip.
The gelatin dries along with the gold, and becomes
mirror.
Size Preparations
I will be using gelatin sheets. They are 3"X9" and
scored onto diamond shapes. Use 4 or 5 diamonds per
pint of water. Heat water, drop in the diamonds, dissolve,
and let cool. The size is like glue for the gold leaf.
You use this size to wet the portion of glass you wish
to mirror gild. The glass is suppose to remain wet during
the leaf laying. You will constantly be using the water
gilding brush to do so.
Gold Application
The surface leaf is not like Patent leaf, as it is loose,
and will fly away even if you breathe on it. You cannot use
this type in the wind. A gilder's tip is used to handle
the loose leaf during application. To use the gilder's tip,
gently run the brush in your hair to statically charge the
hair of the brush. This charge will attract the leaf to the
brush, and hold it in place till it touches the glass, at
that exact moment, the leaf will get "sucked" down to the
glass because its wet.
| This shows a gilder's tip. Its that funky look`n
brush.
 |
That's how to put static in the gilder's tip
 |
| This is how to pick it up. 
|
Laying it down.

|
| Here's
what it looks like after its dry.
 |
Finished
 |
Problems Solving
Also, the gelatin
capsules I mentioned, are
not filled with anything, its the actual caps
that are the gelatin.
I also saw Ken Turner at the Product Sign Supply's
"Harvest Moon" letterhead meet, who was water
sizing with a "Spertzer" bottle set to mist. It
looked like it was a lot easier, and faster too.
There is going to be a lot that I'm going to forget
and this is in no way a "bible" for mirror gilding
There are a couple of letterheads that have books
they've written. (that post regular) Kent for one.
As I touch the gold to the wet glass, it tears,
and wrinkles, and I have to come back and mirror
gild it a second time. How to prevent this from happening?
The leaf can be cracking because of two main issues. First, if indeed you are
creating static in your tip, this will cause the leaf to break in the transfer
since static wants to hold the gold to the tip. What you want on the tip is oil
from your hair which will allow you to pick up the leaf and it will still
release. You can also use a small amount of Vaseline or Vaseline hair tonic
directly on the hairs of the tip or rubbed onto your arm or into your hair.
Please re-read pages 18-27 in GLT. Also if you transfer static to the book of
gold itself, the leaf will crack as you lift it. Be sure to lift, not slide the
leaf from the book. Second, the size must be flowing in an even sheet on the
glass. If there are rivelets of size, they will break the gold and cause a chasm
which is difficult to resize much less patch with gold. If you have rivelets,
then you also are getting too much build up of gelatin which will cause
cloudiness in the gild.
Richard Bustamante
of Signs In The Pines
from Nevada City, California
www.signsinthepines.com
or e-mail him at
signsinthepines@sbcglobal.net
[Home
|
Join Us! |
Bulletin Board |
Events
|
Find A Letterhead |
Become A Resident
|
Letterville Merchants
]
Copyright © 2003 The
Letterhead Website |